Showing posts with label Command Prompt. Show all posts

Tuesday, 16 February 2016

Convert FAT32 to NTFS Without Formatting your USB Drive


You have a pen-drive or probably an external hard drive that currently has FAT32 file system and you want to change it to NTFS, because FAT32 does not support to handling large files(over 4GB).Like now you going to copy one single file it size was more then 4GB means you get one error message "The file is too large" or "Not enough disk space error"despite disk space being available.
 Important Note:While this method works perfectly, I would still advise you to backup your data in case anything goes wrong.

FAT32 to NTFS Conversion Steps
1) Open Command Prompt (cmd).
2) Type "chkdsk g: /f" (without quotes) enter, Where G is the letter of the drive to under conversion.
This checks the drive for error and fixes them automatically.
3) Type "convert G: /FS:NTFS" (without quotes) enter,G is again the letter of the drive to be converted.

The command prompt will start the conversion process and after a few minutes, CMD will say that conversion was successful.
Now you can check it in the properties of the drive it changed NTFS format. 
I convert my USB drive using this steps and it worked  now i can able to coping the more then 4GB files. Make it Simple 

Wednesday, 17 June 2015

How to Run Command Prompt Always with Administrator Privilege

Starting from the Windows XP, then in Windows 7 and now in Windows 8, some commands need the administrative privilege to get executed properly. In all versions of Windows, running the command prompt with administrative privilege is not so hard. You can do it by some few clicks.
The commonly followed way is typing ‘cmd’ at the start menu search box (in both Windows 7 and Windows 8) then right-clicking on the ‘cmd.exe’ from the search results and finally, choosing ‘Run as Administrator’. Isn’t it a long way. Better, there would be a one-click way. Here, at tomakeaway.blogspot.com, we’ve brought a shortcut way to open command prompt in Windows always with administrative privilege.

Run Command Prompt always With Administrator privilege

All you need to do is to setup a shortcut of the command prompt in your desktop or at any preferred location so that the command prompt opens directly with the Administrator privilege whenever you click on it. Here is how to do it.

Create the Desktop Shortcut of the Command Prompt

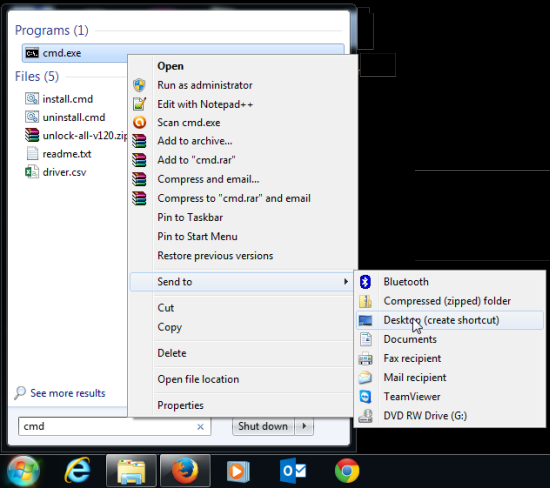
Type ‘cmd’ at the Windows 7 0r Windows 8 search box. This will show the cmd.exe. Just right-click on it and then choose ‘Send to> Desktop (create shortcut)’ from the context menu. The ‘cmd.exe shortcut’ icon gets created at your desktop.


Force the Shortcut to Open Command Prompt always in Administrator Privilege


Right-clicking on the shortcut that you’ve just created at your desktop will open the command prompt but not with the administrator privilege. Here is how to force it.
Right-click on the shortcut and choose ‘Properties’.
The ‘Properties’ window opens up. You can see that you are in the ‘Shortcut’ tab, so, no need to change the tab. Find out the ‘Advanced’ button and click on it.
Now, in the ‘Advanced Properties’ dialog box, check the box ‘Run as administrator’. Click [OK], then again click the [Apply] button.
 
You are done! Next time, whenever you double-click that shortcut, the command prompt will be opened with administrator privilege in C: > Windows > System32 folder.


Sunday, 7 June 2015

How to Remove “Earlier Version of Windows” from Windows Boot Menu

The term "Earlier Version of Windows” appears to the Windows boot menu just after you uninstall a Windows Operating System from a computer that previously had a dual boot configuration. Dual boot configuration can be found on a Windows PC when there are two separate Windows OS installed on a same PC. Whenever, you uninstall any one operating system, in the boot loader the option “Earlier Version of Windows” continuously appears. As a result of it, you have to choose the current operating system name each time you boot into your system. To bypass this annoying issue here I post a simple solution about how to remove earlier version of Windows from the boot menu.
 
The ‘earlier version of Windows’ option only appear if you have a dual boot Windows PC. The option will become useless only when you uninstall any Windows version among two installed OS. I have faced the problem even after installing a separate OS in the separate Windows drive. At the time of uninstalling an operating system I have formatted the associated drive completely. Yet, I get the “Earlier Version of Windows” option at the time of boot for several days.
There are several ways to remove earlier version of Windows option. This problem is very common and can be found in any major version of Windows e.g. Windows (7,8,8.1,XP,vista) and Windows server (2003,2008,2008 R2,2012) Here, I discuss two methods to remove Windows earlier version option.

How to Delete Unnecessary Boot Loader Options from Windows Boot Menu

Delete “Earlier Version of Windows” from Windows Boot Loader Using Command Prompt
At first, boot into existing Windows operating system and open command prompt with Administrator privileges. If you are a Windows 7, Windows 8 or Windows 8.1 user then, in the search box just type “cmd.exe”, right click on the perfect finding and select “run as administrator” option.
Type bcdedit in the command window and press enter.
Boot Configuration Data Editor Tool is a built-in tool of Windows and is used to edit boot menu text, and manages your Windows boot loader. It can be controlled using bcdeditcommand.
Now, in the command window you will see “Windows Boot Loader” entry. Under description section you will find earlier version of Windows option.
To delete the entry you have to enter the below command:
bcdedit /delete {03f85bc7-2a1c-11e4-a669-a8a736dc67a4} /f
Just press enter button and this will immediately delete the entry. Windows will make you confirm with the following message – The Operation Completed Successfully.
Now, you will not see the boot option anymore after restart the PC.

Thursday, 9 April 2015

How to Enable Copy Paste in CMD

 By Default Windows do not allow users to Copy text and Paste it in Command prompt Or Copy text from Command prompt and paste it elsewhere. But there is an option in CMD itself to enable Copy & Paste Text in Windows Command Prompt.

Today in this tutorial we will learn how to Enable Copying and Pasting Texts in Windows Command prompt. One of the main advantage of this will be that you can copy any command that you find on the internet or from any word/excel file and paste it directly in CMD and execute that command just like that.

Step 1: Open CMD
Step 2: Right Click on the Title of the CMD window and Select Properties just like its shown in the below Picture

Step 3: You will see a Pop up Window coming up, Now on the Right hand side, Under Edit Options, Just Check Quick Edit Mode and click OK


Step 4: Everything is Done, Now just Copy any Text from Here or Anywhere else Using CTRL + C keys and just Right click using your mouse on CMD. You will see that the text is been pasted automatically in CMD. Please Understand that Using CTRL + C to Copy text is Important.

Likewise if you wish to Copy Text from CMD to paste elsewhere then Just Select the Text in CMD and Again just Right Click with the mouse. Your Text is Copied and ready to Paste it in any Document you want.
This Doesn’t Limit you to just Text you can even copy File or Folder path and paste it in CMD. Everything that you have to type manually can be copied from somewhere and pasted directly to CMD with this small trick.

So this was just a small  trick I wanted to Share with my Readers so that you don’t have to Type any long Command in CMD which if typed incorrectly can cause errors. I hope this will help some Of you.


Friday, 27 March 2015

How To Hide Drives in Your Windows Using Command Prompt

In this post you will learn  how to hide drives in your windows using command prompt

1.Go to run .
 2.Type "diskpart".
 3.Type "list volume".
 4.Now select the volume you want to hide by typing "select volume n"(n is the volume number against the drive you want to hide). eg: select volume 4.
 5.Type "remove letter Z"(Z is the drive name). eg : remove letter E.


Done, now check my computer. Your drive is hide...
If you want to show the drive again then repeat
step 1 to 4 then type "assign letter E".


 Now check my computer. Your drive is showing...

Note:

**Don't try with drive C **
 ** If you have locked something with Folder lock or other
 software then after assigning the drive everything will be
 unlocked ;)**

Thursday, 19 March 2015

How to find your computer model name and serial number with help of CMD

Now you know your computer model name and serial number means  its very easy to find with help of  Command Prompt.Followed by the instruction given below.

1.Open RUN (Win+ R).
2.Type CMD press enter.
3.Now you want your computer model name
type  wmic csproduct get name press enter.
4.Suppose you want your serial number
type  wmic bios get serialnumber  press enter.


see now its showing your computer model name and serial number make it simple to all.

Wednesday, 18 March 2015

How to Unhide the Hidden Files of your Flash or External Hard Drive

Some times your flash or external hard drive shows some memory space is full but open your drive some time its showing empty, now what to do...
 
That time you need followed by the instruction given below.
 
 
how to unhide the hidden files on your flash  or external hard drive (virus infected maybe)
1.Open RUN (Win+ R).
2.Type CMD press enter.
3.Now type your drive letter (ex: F: press enter).
4.Then type ATTRIB -S -H *.* /S /D press enter
 
Wait for a minute if the directory appear, type Exit then open your Flash or External Hard Drive now see your drive its showing all the files.


Monday, 16 March 2015

How to Check Your Motherboard Model Number on Your Windows PC


Whether you need to update drivers, want to check hardware compatibility, or you’re just curious, it’s way easier to check your motherboard model number with these simple tricks than it is to crack open your computer case to check the board itself. Read on as we show you how to check your motherboard model number from the comfort of your keyboard.

Why Do I Want To Do This?

There are a variety of situations where knowing your motherboard’s model number is important: upgrading your drivers, buying new hardware (you’ll need the proper expansion slots for card-based upgrades and the right memory DIMMS for memory upgrades, etc.), and checking the capabilities of your board if you’re considering upgrading the entire thing.

If you kept the paperwork that came with your computer (or the individual components if you built it yourself) you can often times reference that. Even then, it’s best to check to make sure the documentation is correct. Rather than open the case and search for the model number, it’s easy to use tools within Windows to check things out.

Checking Your Model Number via CMD.exe

If you’re comfortable using the command line, you can easily check a variety of motherboard and hardware stats using the handy Windows Management Instrumentation Command-line (WMIC) a command-line interface for Microsoft’s powerful WMI tool.
With the WMIC we can entry the query baseboard to check motherboard stats and then additional specific query modifiers like get Manufacturer, Model, Name, PartNumber, slotlayout, serialnumber, poweredon to get more detailed information about the motherboard. Let’s check our motherboard’s manufacturer, model number, and serial number using WMIC.
Open up the command prompt in Windows via either the run dialog (WIN+R) or via the search in the start menu; enter cmd.exe into either, no need to run it as an administrator. Enter the following text at the command line.

wmic baseboard get product,Manufacturer,version,serialnumber
This will return the following data.

The above information checks out for our system: the manufacturer is MSI, the board is the Z87-G45 (MS-7821), and while the WMIC tool attempted to check the serial number apparently, alas, MSI left that particular bit unfilled for whatever reason. None the less, the WMIC tool functioned just as it should, and without opening the case or using any third party tools we have the basic information we’re looking for.


Wednesday, 11 March 2015

How to Hide Files and Folders in Windows Using Command Prompt

Today, privacy is a hot topic. The technique of hiding files and folders comes in handy when you are using a computer which is used by more than one person. This article will show you a techie way to hide files and folders in Windows using command line.
In this post you will learn how to show or hide files and folders in Windows using the command line prompt.
We will use the attrib command to hide or show files or folders in Windows.
attrib: Using the attrib command in Windows, we can change file attributes (i.e., read-only, system and hidden flag).
attrib +h [file/folder name]: This will set hidden attributes to active. It will hide a file/folder.
attrib -h [file/folder name]: This will remove hidden attributes from a file to make files/folders visible to everyone.
How to Hide a File in Windows Using Command Prompt
1. Open your Command Prompt window using the Windows + R key combination, and then type cmd.
2. Navigate to the path where your file is located.
3. Type attrib +h file name to make it hidden.
4. To make it visible again, remove the hidden attribute using attrib -h filename

Ex:

your file in F drive and file name pk.txt


How to Hide a Folder in Windows Using Command Prompt
1. Open your Command Prompt window by using the Windows + R key combination, and then type cmd.
2. Navigate to the path where your folder is located.
3. Type attrib +h folder name to make your folder hidden from everyone.
4. To make it visible again, remove the hidden attribute using attrib -h folder_name.
Ex:
your folder in F drive and folder name  pk


That's it guys Make it Simple........ to your privacy.

Tuesday, 3 March 2015

How To Install WindowsXP/7/8/8.1/10 and Ubuntu from USB Flash Drive


The main advantage is that by using USB drive you will be able to install Windows XP/7/8/8.1/10 and Ubuntu in just 15 minutes. You can also use this bootable USB Flash Drive on friend’s computer who doesn’t have a DVD optical drive.
 
The method is very simple and you can use without any hassles. Needless to say that your motherboard should support USB Boot feature to make use of the bootable USB drive. 

Requirements:
1.USB Flash Drive (minimum 4GB) 8GB means it would be able to carry through all type of OS.

2.Windows XP/7/8/8.1/10 and Ubuntu installation files.

3.Follow the below steps to create bootable  USB drive using which you can install Windows XP/7/8/8.1/10 and Ubuntu easily.
 
Procedure:
1. Plug-in your USB flash drive to USB port and move all the contents from USB drive to a safe location on your system.

2. Open Command Prompt with admin rights. Use any of the below methods to open Command Prompt with admin rights.
*Go to RUN type CMD (Windows key + R)

3. You need to know about the USB drive a little bit. Type in the following commands in the command prompt:
 
First type DISKPART and hit enter to see the below message.
 
Next type LIST DISK command and note down the Disk number (ex: Disk 1) of your USB flash drive. In the below screenshot my Flash Drive Disk no is Disk 2.

4. Next type all the below commands one by one. Here I assume that your disk drive no is “Disk 2”.If you have Disk 1 as your USB flash drive then use Disk 1.Refer the above step to confirm it.

So below are the commands you need to type and execute one by one:

SELECT DISK 2
CLEAN
CREATE PARTITION PRIMARY
SELECT PARTITION 1
ACTIVE
FORMAT FS=NTFS
(Format process may take few seconds)
ASSIGN
(now open your USB drive and copy the OS files)
EXIT


Now your USB drive is ready to install the OS.
 
Note: If you are not able to boot after following this guide means you haven’t set the BIOS priority to USB. If you got any problem in following this guide feel free to ask questions by leaving comment.