Showing posts with label Laptop & Computers. Show all posts

Tuesday, 21 July 2020

"CredSSP encryption oracle remediation" error when you try to RDP to a Windows

When you try to connect to a computer that does not have the CredSSP encryption oracle remediation error update, the Remote Desktop Connection will display the an error message telling that you that an authentication error has occurred due to CredSSP encryption oracle remediation.

Microsoft released a security update to address vulnerabilities for the Credential Security Support Provider protocol (CredSSP) used by Remote Desktop Protocol (RDP) connections for Windows clients and Windows Server.
Previously, you were able to connect remotely from the updated machine to machines without the update. However, with the latest update released this May, Microsoft hardened security, and you can no longer connect to machines without the update.
You will face the CredSSP encryption oracle remediation error if you have applications or services such as the Remote Desktop Connection that use CredSSP on an updated machine. Authentication will not work and you will get this error message:
Windows 10 RDP CredSSP Encryption Oracle Remediation Error Fix ...
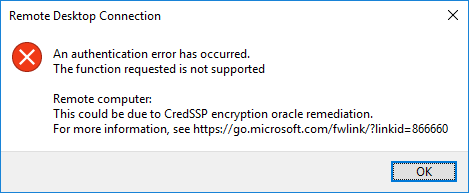
An authentication error has occurred. The function requested is not supported. Remote computer: This could be due to CredSSP encryption oracle remediation.
To solve this issue, you have to install the update on the servers. However, if you need to connect to a computer that hasn't received the update, you can downgrade the protection level to Vulnerable. You can do this either via Group Policy or by changing the registry.
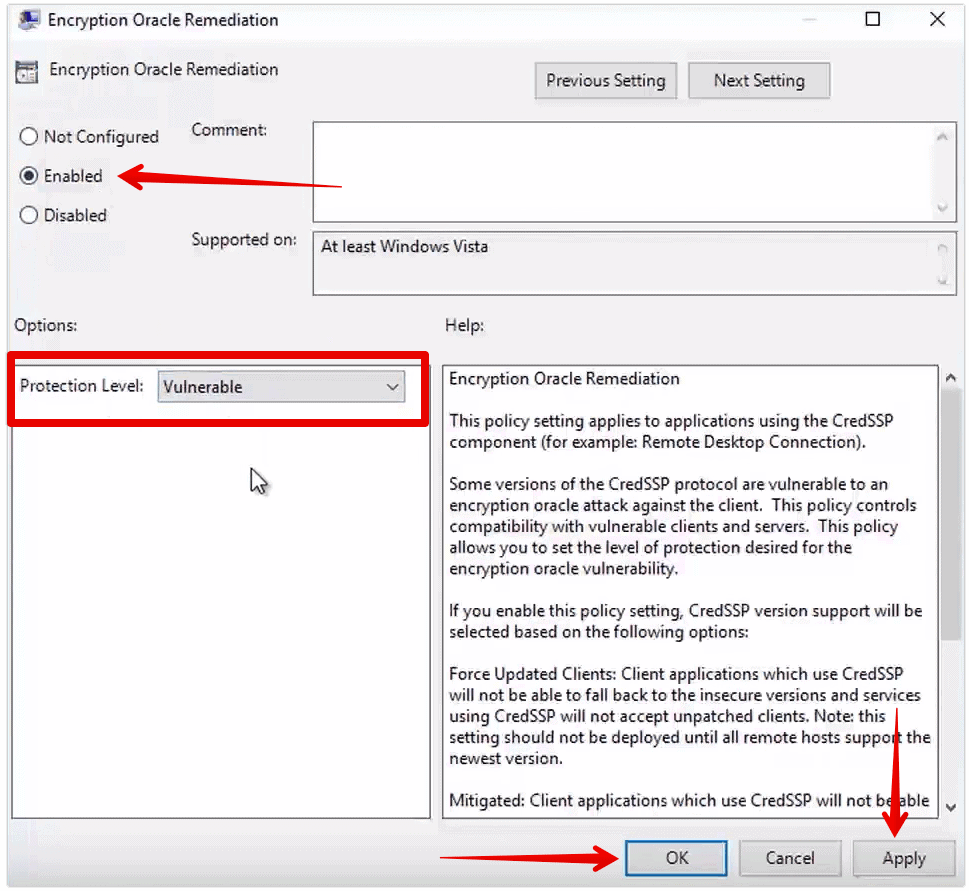
The Group Policy setting you need is Encryption Oracle Remediation. It provides three protection levels:
  • Force Updated Clients: This is the highest level of protection because it requires applying the update to all clients you are going to communicate with using CredSSP. Thus, do not choose this option before applying the update to all of your clients and servers.
  • Mitigated: This level blocks applications such as the Remote Desktop Connection to connect to servers that do not have the update. However, services that use CredSSP will work.
  • Vulnerable: This is the lowest level of protection. It will allow you to connect to servers remotely using RDP. However, it will expose the servers to attacks.
To set the protection level to Vulnerable via Group Policy, follow these steps:
  1. Execute gpedit.msc
  2. Navigate to the following path: Computer Configuration > Administrative Templates > System > Credentials Delegation.
  3. Edit the following setting: Encryption Oracle Remediation.
  4. Set it to Enabled, and set the protection level to Vulnerable.
2 Ways to Fix CredSSP Encryption Oracle Remediation Error in ...

Tuesday, 16 February 2016

Convert FAT32 to NTFS Without Formatting your USB Drive


You have a pen-drive or probably an external hard drive that currently has FAT32 file system and you want to change it to NTFS, because FAT32 does not support to handling large files(over 4GB).Like now you going to copy one single file it size was more then 4GB means you get one error message "The file is too large" or "Not enough disk space error"despite disk space being available.
 Important Note:While this method works perfectly, I would still advise you to backup your data in case anything goes wrong.

FAT32 to NTFS Conversion Steps
1) Open Command Prompt (cmd).
2) Type "chkdsk g: /f" (without quotes) enter, Where G is the letter of the drive to under conversion.
This checks the drive for error and fixes them automatically.
3) Type "convert G: /FS:NTFS" (without quotes) enter,G is again the letter of the drive to be converted.

The command prompt will start the conversion process and after a few minutes, CMD will say that conversion was successful.
Now you can check it in the properties of the drive it changed NTFS format. 
I convert my USB drive using this steps and it worked  now i can able to coping the more then 4GB files. Make it Simple 

Wednesday, 11 November 2015

How to Use Keyboard as Mouse in Windows

Recently my Mouse Stopped Working because of Drivers got corrupted; Due to this Problem i was not able to use my mouse. I tried every possible Solution like uninstalling drivers and restarting my PC. Unplugging and then plugin my mouse back, and yeah Searched internet too, since i was not able to use my mouse, i had to Use Keyboard as Mouse While Finding for solution to this Problem.
Windows OS has an Inbuilt option Called MouseKeys, Not much people are aware of it but yes now you are.  You can Enable/disable and disable MouseKeys very easily.
  • You can enable it by Pressing Alt + Shift + Numlock   keys. As soon as you do it, you will be prompt with the below dialog box, Just Click Yes to it.

  • Make Sure your Numlock is off while you Use keyboard as mouse.
  • Done!!! Now you will see MouseKeys icon on your task bar, which means now you are all set.
  • Now talking about the Controllers, Use 8, 2, 4 and 6 Keys from Numpad to move Up, Down, Left and Right Respectively.

Alternatively you can also use Third Party Program Called NeatMouse , This software is portable, Main advantage to use it is it gives you better Control because of additional options that it makes available. it have an option to Remap Controller keys according to your Comfort.

Probably we will have to Use Keyboard as Mouse temporarily and not for long time so one may not prefer to get third party software for this task, but many may do it as it is free and can be helpful.

Thursday, 29 October 2015

Why We Can't Create Con Folder in Windows?

A Reason behind Why We Can’t Create Specific Folders in Windows
Most of us are aware, we can't create a folder with name "Con" in windows and all most many of us don't know the reason. 
Well I tell you the reason and list of keywords which we can't use in windows to create folders or file.
Reason: 
We cannot create folder with con, aux, nul because these are reserved keywords used by DOS. So if we were allowed to create such folders than there will be an ambiguity, in where to write data when the data is supposed to; go to the specified devices.

Keywords and Their corresponding Functions:

Reserved Keywords
Function
CON
Keyboard and Display
PRN
System list device, usually a parallel port
AUX
Auxiliary Device, usually a serial port
NUL
Bit-Bucket Device
A:-Z:
Drive Letter
COM1
First Serial communications port
COM2
Second Serial communications port
COM3
Third Serial communications port
COM4
Fourth Serial communications port
LPT1
First Parallel printer port
LPT2
second Parallel printer port
LPT3
Third Parallel printer port

Tuesday, 29 September 2015

How much speed support your NIC card (LAN Card) in your system?

Do you want to know your system NIC card (LAN Card) supporting speed just follow my steps 
  • Go to the Control Panel".
  • Select "Network and Sharing Center".
  • On the Left panel select "Change Adapter settings"
  • Right click on the "Local area Connection" and select "Properties".
  • In the "Local Area Connection Properties" window select the "Configure" button.
  • Select the "Advanced" tab.
  • In the scroll list of options find "Speed & Duplex" or "Link Speed & Duplex" and select it.
  • The NIC speed will be displayed in the "Value" drop down menu.
My system (NIC card) support up-to 1 G bps, What about your System ?

Wednesday, 8 July 2015

How to Import Your Bookmarks From One Browser to Another

Most internet users find difficulty in using bookmarks while switching from one browser to another browser. Switching from one browser to another browser doesn’t automatically import bookmarks too from one browser to another.
Luckily Google Chrome provides option to import bookmarks from Internet Explorer and Firefox. So anyone can transfer all their bookmarks from one browser to another by performing a few simple steps
Let see now how to import the bookmarks from Internet Explorer and Firefox into Google Chrome

Google Chrome Import Bookmarks from Internet Explorer

Click the Google chrome menu icon from the right-top corner of the browser
select Bookmarks > Select Import Bookmark Settings.

Now you can see the Import Bookmark Settings, here you need to select which Browser bookmarks import to Google Chrome.Here l has selected internet explorer then click the import button.


Your all Bookmarks will imported from Internet Explorer to Chrome now.


You can see/ access your imported bookmarks from the Import from IE folder.

Google Chrome Import Bookmarks from Firefox

Google Chrome importing bookmarks from Internet explorer is similar to import Firefox bookmarks. 

Click the Google chrome menu icon from the right-top corner of the browser
select Bookmarks > Select Import Bookmark Settings.

Now you can see the Import Bookmark Settings, here you need to select which Browser bookmarks import to Google Chrome.  Here l has selected internet explorer then click the import button.


Your all Bookmarks will imported from Firefox to Chrome now. 


Now you can use all the imported bookmarks into Google Chrome itself. Make it Simple

Sunday, 21 June 2015

How to Access Gmail When You are Offline

Suppose, you are in a hurry to read an important email from your inbox.Then you, suddenly noticed your internet connection but it's not available at your home or office. Oops! You are stuck at your desk waiting for the internet connection.
Google is always familiar with the user-requirements and they offers useful services. That is why they included the offline feature in Gmail. Using this you can access your Gmail inbox offline. You can read the emails from your inbox without any internet connection. The offline mode also allows downloading the attachments at your local computer.
Anyone can enjoy the Gmail offline feature. What you need is a Gmail account and a short span of time to set it up for the offline mode as the offline mode is disable by default. Here is how to prepare your Gmail account in advance and access Gmail when you’re offline.
Note: You can use the Gmail offline feature only in Google Chrome browser. So, at first,install the Chrome browser if you do not have it in your computer.
How to enable the offline mode in Gmail
1. Sign into your Gmail account using Google Chrome browser and go to ‘Settings’ at the right-hand corner from the top and select the ‘Offline’ tab. Now, Click the ‘Install Gmail Offline’ link.
This will open the the Gmail offline app page in chrome web-store.
2. Click the Add to Chrome button and then the ‘Add’ button at the popped up dialogue box.

It will install the Gmail Offline app at your browser.
3. Open a new tab in your browser and open the installed apps in your browser by clicking the ‘Apps’ icon from the left corner.
4. Allow offline mail by choosing the appropriate radio button and hit ‘Continue’.
You are done! You can now see that your browser has started backing up your emails and attachments locally.
Configure the Gmail offline settings
After getting ready with the Gmail offline feature, you can customize the setting by clicking the Gear icon. Choose the time from when you want to download the emails for offline reading.
                                               Make it Simple

Wednesday, 17 June 2015

How to Run Command Prompt Always with Administrator Privilege

Starting from the Windows XP, then in Windows 7 and now in Windows 8, some commands need the administrative privilege to get executed properly. In all versions of Windows, running the command prompt with administrative privilege is not so hard. You can do it by some few clicks.
The commonly followed way is typing ‘cmd’ at the start menu search box (in both Windows 7 and Windows 8) then right-clicking on the ‘cmd.exe’ from the search results and finally, choosing ‘Run as Administrator’. Isn’t it a long way. Better, there would be a one-click way. Here, at tomakeaway.blogspot.com, we’ve brought a shortcut way to open command prompt in Windows always with administrative privilege.

Run Command Prompt always With Administrator privilege

All you need to do is to setup a shortcut of the command prompt in your desktop or at any preferred location so that the command prompt opens directly with the Administrator privilege whenever you click on it. Here is how to do it.

Create the Desktop Shortcut of the Command Prompt

Type ‘cmd’ at the Windows 7 0r Windows 8 search box. This will show the cmd.exe. Just right-click on it and then choose ‘Send to> Desktop (create shortcut)’ from the context menu. The ‘cmd.exe shortcut’ icon gets created at your desktop.


Force the Shortcut to Open Command Prompt always in Administrator Privilege


Right-clicking on the shortcut that you’ve just created at your desktop will open the command prompt but not with the administrator privilege. Here is how to force it.
Right-click on the shortcut and choose ‘Properties’.
The ‘Properties’ window opens up. You can see that you are in the ‘Shortcut’ tab, so, no need to change the tab. Find out the ‘Advanced’ button and click on it.
Now, in the ‘Advanced Properties’ dialog box, check the box ‘Run as administrator’. Click [OK], then again click the [Apply] button.
 
You are done! Next time, whenever you double-click that shortcut, the command prompt will be opened with administrator privilege in C: > Windows > System32 folder.


Sunday, 7 June 2015

How to Remove “Earlier Version of Windows” from Windows Boot Menu

The term "Earlier Version of Windows” appears to the Windows boot menu just after you uninstall a Windows Operating System from a computer that previously had a dual boot configuration. Dual boot configuration can be found on a Windows PC when there are two separate Windows OS installed on a same PC. Whenever, you uninstall any one operating system, in the boot loader the option “Earlier Version of Windows” continuously appears. As a result of it, you have to choose the current operating system name each time you boot into your system. To bypass this annoying issue here I post a simple solution about how to remove earlier version of Windows from the boot menu.
 
The ‘earlier version of Windows’ option only appear if you have a dual boot Windows PC. The option will become useless only when you uninstall any Windows version among two installed OS. I have faced the problem even after installing a separate OS in the separate Windows drive. At the time of uninstalling an operating system I have formatted the associated drive completely. Yet, I get the “Earlier Version of Windows” option at the time of boot for several days.
There are several ways to remove earlier version of Windows option. This problem is very common and can be found in any major version of Windows e.g. Windows (7,8,8.1,XP,vista) and Windows server (2003,2008,2008 R2,2012) Here, I discuss two methods to remove Windows earlier version option.

How to Delete Unnecessary Boot Loader Options from Windows Boot Menu

Delete “Earlier Version of Windows” from Windows Boot Loader Using Command Prompt
At first, boot into existing Windows operating system and open command prompt with Administrator privileges. If you are a Windows 7, Windows 8 or Windows 8.1 user then, in the search box just type “cmd.exe”, right click on the perfect finding and select “run as administrator” option.
Type bcdedit in the command window and press enter.
Boot Configuration Data Editor Tool is a built-in tool of Windows and is used to edit boot menu text, and manages your Windows boot loader. It can be controlled using bcdeditcommand.
Now, in the command window you will see “Windows Boot Loader” entry. Under description section you will find earlier version of Windows option.
To delete the entry you have to enter the below command:
bcdedit /delete {03f85bc7-2a1c-11e4-a669-a8a736dc67a4} /f
Just press enter button and this will immediately delete the entry. Windows will make you confirm with the following message – The Operation Completed Successfully.
Now, you will not see the boot option anymore after restart the PC.

Monday, 1 June 2015

Use Laptop at Night With Ease For Eyes

Many of us are habitual of using laptops till late at night and we often don’t care about sleepy eyes. I myself feel much tired at moments when my laptop clock tells me that “It’s 2am” but since I am a computer enthusiast so often things are at zenith for me during laptop usage. Thus, as a result being so much curious about any thing which I am trying to develop over my laptop I never ever think to close the lid of laptop and take some rest for sake of my eyes. Since as per my opinion LED’s of modern laptops are not of that much harm to our eyes as compared to those traditional monitors which had those big picture tubes. However, still a rest of few minutes for the care of eyes is necessary instead of using laptop continuously without looking at the surroundings.
So, What to do when you are tired and still you want to use the laptop without the fear of looking at burning sun while sitting in the dark. I have a cool solution here in terms of a cool and handy software.
Flux – Software to make your life better:
I have been using this software since long time. This application has proved to safe my life a lot in conditions when I am feeling uneasy to look at my laptop screen because of the brightness. I don’t use this software for 24 hours, rather I just enable it for the time when I don’t feel satisfactory with the blue light being emitted from the LED screen of my laptop. This blue bright light is really irritating for me when I am tired and also at the same time I need to do more work.
You can download this software. After that just install it and it will detect your area of living automatically and if it doesn’t detect that, then kindly provide your area from the settings of this software.
 This software just makes the display of your screen more warmer and you feel more comfortable.
If you are doing color sensitive job then kindly tick the “Disable for one hour” to disable the application so that your display may again show original colors instead of warmer one.

Tuesday, 12 May 2015

Microsoft launched its Office 2016 Preview

Microsoft launched the Office 2016 Preview, and with it came a couple of new features. These include stronger improved data analysis in Excel, flexible deployment for admins, added security features, and more. Today, we take a look at a more pressing feature though – the collaborative editing.
In today's world, many group projects are done with some form of collaborative editing, where multiple users edit a single document all at the same time. There are a handful of collaborative editing tools available today, with Google Docs setting the standard.
Of course, it is widely known that Google Docs is great for editing text or simple spreadsheets in groups, but formatting in Google Docs is still a bit dodgy, so most groups will find themselves simply working on the raw text in there, and when it is done, having one member of the group move the content to a better text editor for the final makeup.
Because of formatting problems, when Microsoft announced collaborative editing in Word we were quite excited, because this may just make it the ultimate go-to text editor for group work, taking the throne from Google.
So, I fired up the Office 2016 Preview installation, which went smooth as butter. The only hitch I experienced on the way was that the "Terms & Conditions" dialogue that you're supposed to read through was empty. Delightfully, I pressed accept for no conditions at all, and got to work.
To use the collaborative editing feature, you must use Microsoft's OneDrive. I had never used OneDrive before, but signing into my Microsoft account and setting it up was a snap, as was saving a document to it.
This is where things started to take a turn, however. I installed the suite on a second PC too, and signed in with another Microsoft account, but while sharing the document was fairly easy, when I edited the document on the second PC no changes showed up on the first. I hit CTRL-S to save the document, and still no changes showed up, but I did get a pop-up dialogue telling me that "When you save, Word updates your document with the changes made by others."
Correct me if I'm wrong, but that isn't the real-time editing we were promised.
Fortunately, the Web editor does work the way it is meant to. Between two different web editors working on the same document, changes do show up in real-time, albeit with a notable delay. This delay isn't game-breaking, but it is enough to put me off from using the Web editor, too. Naturally, to see anything that's been typed in through the Web editor, users on the desktop application will have to save their document to see the changes.
Due to these flaws, at this very moment, I simply cannot recommend using Word in the Microsoft Office 2016 Preview for collaborative editing. The experience is too broken and unrefined, and will likely cause more headaches than it is worth.
However, let's look at it in another way: This is still a Preview application, and therefore not representative of the final product. All we can hope for is that the way it works now isn't the way that Microsoft has intended for the collaborative editor to work, and that the current version is simply a makeshift fix in order to have a working prototype out in time for this Preview package.
What will it take to make us happy with the collaborative editing feature in Microsoft Word? A simple setup (check), easy sharing (check), along with real-time editing between the Web editor and the desktop application as snappy as it works in Google Docs, without sacrificing any of Word's compelling features. In short, I just want to use the feature, without having to think about how to use it.
 
Product key for the Office 2016 Preview
NKGG6-WBPCC-HXWMY-6DQGJ-CPQVG

Download links
Get Office 2016 Preview (32 bit)
Get Office 2016 Preview (64 bit)