Showing posts with label Internet. Show all posts

Friday, 16 October 2015

Save Facebook Posts to Read Later

So many times it happens that, some of your friends have shared some interesting news, event or something which you will not be in position to go through due to time constraint and you might need to bookmark them or save Facebook posts to read later, else you may forget or end up spending more time searching them on your friend’s wall.
Save Facebook Posts
  • Identify the posts which you would like to save in your news feeds or from your Friend’s wall.
  • Click on the arrow on top right corner of the post.
  • Click on “Save for Later”,
  • Yes,now it’s done. Like that you have save links, photos, places, music, books, movies, TV shows and Events ... ect.
View Saved Facebook posts

Once you follow procedure to Save posts, it will be stored in your “Saved Items” and ONLY YOU can view them.
  • Go to your Facebook Home 
  • Left column you will find “Saved” button (You will find this button only If you have Saved something).
  • Click on “Saved” button and you will get all Saved Posts.
Now don't waste your time to spend searching your friends older post . If you like some posts but you don't have time to read. That time you do this. Make it Simple


Wednesday, 23 September 2015

Gmail updates the option to block unwanted emails


Sometimes you get mail from someone who’s really disruptive.Hopefully it doesn’t happen often but when it does, you should be able to say, “Never see messages from this person again.” 


That’s why you can now block specific email addresses in Gmail -starting today on the web,and over the next week on Android. 

open your inbox to block someone just press the "More" button right next reply (a down arrow on the Web and three vertical dots on Android) and you'll see an option to block that email address. 

Once you block the person, any mail they send you from that email address in the future will go to the spam folder. 

If you and your ex end up working things out, you can always unblock them from your Settings.

Thursday, 13 August 2015

Backup Facebook photos, videos, and text

Facebook gives you an added feature to back up your photos, videos, and text.

Click Account and go to General Account Settings there you will see the basic account setting like Name, User Name, G mail, Password..... Etc. In bottom of the page you have an option "Download a copy of your Facebook data".

Now you click that option then after few minutes you will get one notification mail from Facebook and they will give one request link. Open that link there you will see the details about your Facebook account.

After that you will get one more mail from Facebook. In that mail they will give download link, click that link and the file gets automatically downloaded.

Friday, 10 July 2015

How to Automatically Delete Spam Messages in Gmail

Gmail has a quick solution to that.It will automatically delete all of the spam messages in your Spam folder every thirty days.
Here are the simple steps to follow in order to delete the spams automatically from your email account.
1.Open your Gmail Settings by clicking on the Gear button.
2.Select Filters tab from it.Now click on Create a New Filter.
3.Now a window will pop-up, look for the Has the Words field in this window and type “in:spam” without quotes.
Leave all other fields empty and click Create Filter with this Search and select OK to proceed to next step.
4.Confirm your action by clicking “OK”
5.Check mark the box Delete it and Also Apply filter to next to Create Filter and click on Create Filter.

6.Now you will see a message Your Filter was Created.
That's it! Now all your spam messages will be automatically delete and there will be no message in your Spam folder anymore. Make it Simple

Wednesday, 8 July 2015

How to Import Your Bookmarks From One Browser to Another

Most internet users find difficulty in using bookmarks while switching from one browser to another browser. Switching from one browser to another browser doesn’t automatically import bookmarks too from one browser to another.
Luckily Google Chrome provides option to import bookmarks from Internet Explorer and Firefox. So anyone can transfer all their bookmarks from one browser to another by performing a few simple steps
Let see now how to import the bookmarks from Internet Explorer and Firefox into Google Chrome

Google Chrome Import Bookmarks from Internet Explorer

Click the Google chrome menu icon from the right-top corner of the browser
select Bookmarks > Select Import Bookmark Settings.

Now you can see the Import Bookmark Settings, here you need to select which Browser bookmarks import to Google Chrome.Here l has selected internet explorer then click the import button.


Your all Bookmarks will imported from Internet Explorer to Chrome now.


You can see/ access your imported bookmarks from the Import from IE folder.

Google Chrome Import Bookmarks from Firefox

Google Chrome importing bookmarks from Internet explorer is similar to import Firefox bookmarks. 

Click the Google chrome menu icon from the right-top corner of the browser
select Bookmarks > Select Import Bookmark Settings.

Now you can see the Import Bookmark Settings, here you need to select which Browser bookmarks import to Google Chrome.  Here l has selected internet explorer then click the import button.


Your all Bookmarks will imported from Firefox to Chrome now. 


Now you can use all the imported bookmarks into Google Chrome itself. Make it Simple

Sunday, 5 July 2015

Can I stop or ‘un-send’ an email I sent by mistake?

  1. Ya now you can do that, just follow my instruction


    Sometimes we send an e-mail to someone, as soon as press send button. So realize that maybe something went wrong. With all of us, sometimes it is surely. After sending the email and we are thinking that I can cancel it. But now it is really possible to cancel the email, if you want to cancel any e-mail, use below method.But you have only 30 sec to undo the send mail.
  2. Here's how it works:
    1. Click the gear icon in the top-right corner of your Gmail window and select Settings from the dropdown menu.
    2. In general setting scroll down to the bottom where you see Undo Send and click Enable.
    3. Select a send cancellation period upto 30 seconds.
    4. Hit Save Changes at the bottom.

Now when you send an email, the yellow dialogue that displays "Your message has been sent" will also give you the option to Undo. Click it, and the email will reopen, un-sent, in the composition window.


For now, Undo Send feature is not available for the Gmail mobile app for smartphone devices. However, the company is planning to roll out the feature for the mobile app soon.

Sunday, 21 June 2015

How to Access Gmail When You are Offline

Suppose, you are in a hurry to read an important email from your inbox.Then you, suddenly noticed your internet connection but it's not available at your home or office. Oops! You are stuck at your desk waiting for the internet connection.
Google is always familiar with the user-requirements and they offers useful services. That is why they included the offline feature in Gmail. Using this you can access your Gmail inbox offline. You can read the emails from your inbox without any internet connection. The offline mode also allows downloading the attachments at your local computer.
Anyone can enjoy the Gmail offline feature. What you need is a Gmail account and a short span of time to set it up for the offline mode as the offline mode is disable by default. Here is how to prepare your Gmail account in advance and access Gmail when you’re offline.
Note: You can use the Gmail offline feature only in Google Chrome browser. So, at first,install the Chrome browser if you do not have it in your computer.
How to enable the offline mode in Gmail
1. Sign into your Gmail account using Google Chrome browser and go to ‘Settings’ at the right-hand corner from the top and select the ‘Offline’ tab. Now, Click the ‘Install Gmail Offline’ link.
This will open the the Gmail offline app page in chrome web-store.
2. Click the Add to Chrome button and then the ‘Add’ button at the popped up dialogue box.

It will install the Gmail Offline app at your browser.
3. Open a new tab in your browser and open the installed apps in your browser by clicking the ‘Apps’ icon from the left corner.
4. Allow offline mail by choosing the appropriate radio button and hit ‘Continue’.
You are done! You can now see that your browser has started backing up your emails and attachments locally.
Configure the Gmail offline settings
After getting ready with the Gmail offline feature, you can customize the setting by clicking the Gear icon. Choose the time from when you want to download the emails for offline reading.
                                               Make it Simple

Sunday, 15 March 2015

How to Send voice messages and make status updates on Facebook!

Send voice status updates, and messages on Facebook!

This free extension lets you record and make and send voice messages and status updates on Facebook, in a seamless manner, that could be played by all your Facebook friends .


1.Open your chrome browser
2.Go to web store
3.Search talk & comment for Facebook
4.Click on top of the +free
5.Click Add
6.It ll download and install in your Facebook
7.Now login your Facebook and record your voice message and Send voice messages , make status updates


get more details Click here and watch this video

https://www.youtube.com/watch?v=-ombzVoQVpY


Let's make Voice fun again !

Saturday, 14 March 2015

Get notified, when you lose a friend on Facebook

Want to know when someone unfriends you on Facebook? 
Now you can! 
 Unfriend Notify for Facebook is the original solution! 
   Don´t get fooled by clones! 
 -Beautiful Facebook integration! 
 -Push-notifications and much more!  
 -Have a try and never miss out if you lost a friend!  
 -Data locally stored at your computer!Our extensions are free of charge! 
  Our extensions are free of charge! 

1.Open your chrome browser
2.Go to web store
3.Search unfriend notify for Facebook
4.Click on top of the +free
5.Click Add
6.It ll download and install in your Facebook
7.Logout your Facebook and login again
8.Now goto your friends list and see your lost friends list.

Friday, 13 March 2015

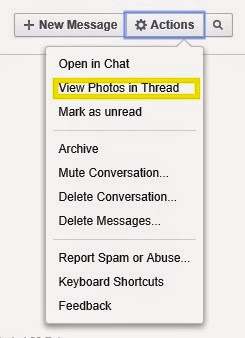
How Do I Find All the Pictures Inside a Facebook Chat?


If you usually share photos with friends using Facebook Chat and now you want to find all of them, you could go back to your chat history and find every single image from there. While it is possible to find all of the images using this method, it takes a lot of time. 

Fortunately, Facebook provides a convenient feature that allows you to view all of your shared images in one place. Here is how to access this feature.


For system users:

1.Log in to your Facebook account.


2.On the left sidebar, choose Messages, and then choose the conversation that you want to view.


3.Inside the conversation, click the Actions button, and then choose View Photos in Thread.


4.Now, you can see all of the photos that you and your friend shared inside that conversation.